Building a Bluetooth-Controlled Car with Arduino and HC-05 Module
This tutorial guides you through creating a Bluetooth-controlled car using an Arduino Uno and an HC-05 Bluetooth module. Inspired by Ameya Angadi's project, this car can be controlled wirelessly via a smartphone, making it a fun and educational robotics project. Original project
Components Needed
- Arduino Uno
- HC-05 Bluetooth Module
- L298N Motor Driver
- 4 DC Motors with Wheels
- Chassis for the Car
- Jumper Wires
- Breadboard
- 9V Battery (or 12V power source for motors)
- USB Cable for Arduino
- Smartphone with Bluetooth RC Controller App (e.g., from Google Play Store)
Step 1: Setting Up the Hardware
-
Assemble the Car Chassis:
- Attach the four DC motors with wheels to the chassis corners.
- Secure the Arduino Uno and breadboard to the chassis.
-
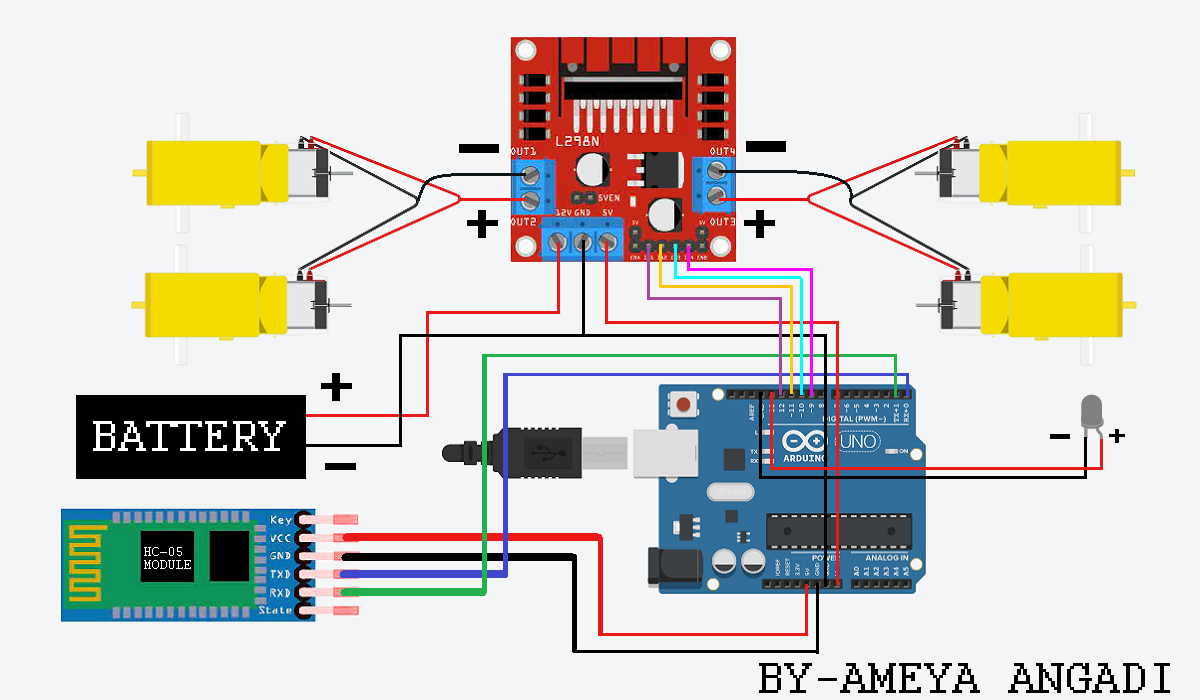
Connect the L298N Motor Driver:
- Connect Motor A (left motors) to OUT1 and OUT2 on the L298N.
- Connect Motor B (right motors) to OUT3 and OUT4 on the L298N.
- Connect IN1 to Arduino Pin 13, IN2 to Pin 12, IN3 to Pin 11, IN4 to Pin 10.
- Connect L298N VCC to 9V/12V battery, GND to Arduino GND and battery GND.
-
Connect the HC-05 Bluetooth Module:
- VCC to Arduino 5V
- GND to Arduino GND
- TX to Arduino Pin 3 (RX, via SoftwareSerial)
- RX to Arduino Pin 2 (TX, via voltage divider to step down 5V to 3.3V)
- Secure all connections and ensure the battery is connected to power the motors and Arduino.
Note: Connect the HC-05 module after uploading the code to avoid errors.
Step 2: Arduino Code
The Arduino code receives commands from a smartphone via the HC-05 Bluetooth
module and controls the DC motors using the L298N driver. Install the SoftwareSerial
library in the Arduino IDE.
#include

// Define pins for motor driver
#define LEFT_MOTOR_FORWARD 13
#define LEFT_MOTOR_REVERSE 12
#define RIGHT_MOTOR_FORWARD 11
#define RIGHT_MOTOR_REVERSE 10

// Define pins for Bluetooth module
#define BT_RX 3
#define BT_TX 2

SoftwareSerial bluetooth(BT_RX, BT_TX); // RX, TX

char command;

void setup() {
  // Set motor pins as outputs
  pinMode(LEFT_MOTOR_FORWARD, OUTPUT);
  pinMode(LEFT_MOTOR_REVERSE, OUTPUT);
  pinMode(RIGHT_MOTOR_FORWARD, OUTPUT);
  pinMode(RIGHT_MOTOR_REVERSE, OUTPUT);

  // Initialize serial communications
  Serial.begin(9600);
  bluetooth.begin(9600);

  // Ensure motors are off initially
  digitalWrite(LEFT_MOTOR_FORWARD, LOW);
  digitalWrite(LEFT_MOTOR_REVERSE, LOW);
  digitalWrite(RIGHT_MOTOR_FORWARD, LOW);
  digitalWrite(RIGHT_MOTOR_REVERSE, LOW);
}

void loop() {
  if (bluetooth.available()) {
    command = bluetooth.read();
    Serial.println(command); // For debugging

    // Stop the car
    if (command == 'S') {
      digitalWrite(LEFT_MOTOR_FORWARD, LOW);
      digitalWrite(LEFT_MOTOR_REVERSE, LOW);
      digitalWrite(RIGHT_MOTOR_FORWARD, LOW);
      digitalWrite(RIGHT_MOTOR_REVERSE, LOW);
    }
    // Move forward
    else if (command == 'F') {
      digitalWrite(LEFT_MOTOR_FORWARD, HIGH);
      digitalWrite(LEFT_MOTOR_REVERSE, LOW);
      digitalWrite(RIGHT_MOTOR_FORWARD, HIGH);
      digitalWrite(RIGHT_MOTOR_REVERSE, LOW);
    }
    // Move backward
    else if (command == 'B') {
      digitalWrite(LEFT_MOTOR_FORWARD, LOW);
      digitalWrite(LEFT_MOTOR_REVERSE, HIGH);
      digitalWrite(RIGHT_MOTOR_FORWARD, LOW);
      digitalWrite(RIGHT_MOTOR_REVERSE, HIGH);
    }
    // Turn left
    else if (command == 'L') {
      digitalWrite(LEFT_MOTOR_FORWARD, LOW);
      digitalWrite(LEFT_MOTOR_REVERSE, HIGH);
      digitalWrite(RIGHT_MOTOR_FORWARD, HIGH);
      digitalWrite(RIGHT_MOTOR_REVERSE, LOW);
    }
    // Turn right
    else if (command == 'R') {
      digitalWrite(LEFT_MOTOR_FORWARD, HIGH);
      digitalWrite(LEFT_MOTOR_REVERSE, LOW);
      digitalWrite(RIGHT_MOTOR_FORWARD, LOW);
      digitalWrite(RIGHT_MOTOR_REVERSE, HIGH);
    }
  }
}
Upload this code to your Arduino Uno using the Arduino IDE. Ensure the HC-05 is disconnected during upload to avoid errors.
[](https://projecthub.arduino.cc/angadiameya007/876cd251-ae53-44a4-92e9-a1444153e343)Step 3: Using the Bluetooth-Controlled Car
Once the code is uploaded and the hardware is connected, you can control the car using a smartphone:
- Install a Bluetooth RC App: Download an app like "Bluetooth RC Controller" from the Google Play Store. [](https://github.com/DevelopedByAnurag/arduino-bluetooth-car)
- Pair the HC-05: In your smartphone's Bluetooth settings, pair with the HC-05 module (default PIN is usually 1234 or 0000).
- Control the Car: Use the app to send commands:
- 'F': Move forward
- 'B': Move backward
- 'L': Turn left
- 'R': Turn right
- 'S': Stop
- Place the car on a flat surface and test its movement in an open area.
Ensure the HC-05 is within 10 meters of the smartphone for reliable Bluetooth communication.
Step 4: Testing and Troubleshooting
- Upload the code and open the Serial Monitor (9600 baud) to verify Bluetooth commands are received.
- Test the motors by directly powering the L298N to ensure they work independently.
- Check Bluetooth connectivity by pairing with the HC-05 and sending commands via the app.
- If the car doesnt move, verify all connections, ensure the battery is sufficiently charged, and check that the HC-05 RX pin receives a 3.3V signal (use a voltage divider if needed).
- Ensure the Bluetooth module is disconnected during code upload to prevent errors.
Conclusion
You've built a Bluetooth-controlled car using an Arduino Uno and HC-05 module! Enhance it by adding speed control with PWM, incorporating sensors for obstacle avoidance, or designing a custom chassis for better aesthetics. Experiment with different apps or add LED indicators for a more dynamic experience.